

Marketing tips, news and more
Explore expert-backed articles on SEO, data, AI, and performance marketing. From strategic trends to hands-on tips, our blog delivers everything you need to grow smarter.

2023 Trends in the Digital World
The digital world continues to grow and evolve with advancing technology. In order to keep up with innovations driven by leading tech companies like Google, Meta, and Apple, brands and websites must follow the latest trends of 2023 and integrate them into their own practices. In this article, we’ll share the key digital trends for 2023 so you can improve your measurement, stay on trend, and remain competitive in digital marketing.What Awaits Us in 2023?In 2023, the data and analytics driving digital marketing will shift toward a more human-centered approach, with artificial intelligence and machine learning playing an increasingly prominent role. As emphasis on data security grows, analytics professionals will take on ever more critical responsibilities. The practical trends we expect in 2023 are: More Human-Centered Digital Marketing: Delivering personalized, human-centric experiences will be essential. Marketers will leverage customer behavior, interests, and purchase data to craft highly targeted campaigns. Rise of AI & ML Applications: Artificial intelligence and machine learning will become more widespread, enabling deeper data analysis, more accurate predictions, and faster decision-making. AI will help marketers create more effective campaigns by understanding individual interests and purchase behavior. Greater Emphasis on Data Security: With rising data breaches and cyberattacks, companies will invest more in protecting customer data. Privacy regulations like GDPR will guide best practices. Advanced Data Visualization: Comprehensive visualization tools (e.g., Tableau, Looker Studio) will become even more important for rapid, insightful decision-making. IoT Marketing: The Internet of Things will drive new customer insights via device-to-device data collection, allowing marketers to tailor products and services more precisely. The technical and theoretical digital trends for 2023 include: Meta – Conversions API (CAPI) Google – Server-Side Tagging Google – BigQuery ChatGPT UX Laws & Neuroscience Techniques Meta – Conversions API (CAPI)Conversions API is designed by Meta to create a direct connection between marketing data and ad optimization, reducing cost-per-action and improving measurement across Meta technologies. To send website events via CAPI, you set up and configure a server on Google Cloud Platform (GCP), then forward GA4 web tag data to that server and onward to Meta via CAPI.With Conversions API: Brands lower their cost-per-action. Campaigns become easier to optimize. User data is sent directly from your server to Facebook’s, bypassing cookies and preserving privacy post-iOS 14. Ad performance measurement becomes more reliable. CAPI data is less prone to errors than pixel-based tracking. Google – Server-Side TaggingServer-Side Tagging moves measurement tags from the client (browser) to a server you control (e.g., on GCP). This approach offers several advantages over client-side tagging: Fewer tags on your site/app, improving frontend performance. Better data protection by processing user data in a customer-managed server environment. Simplifies manual CAPI integrations via GTM. Google – BigQueryBigQuery, launched in 2012 on Google’s Dremel technology, is an enterprise data warehouse for fast SQL analytics at scale. With GA4 becoming mandatory in July 2023, brands need BigQuery to store data long-term, visualize accurately, and perform deep analyses.Why BigQuery? Secure, long-term data storage and advanced brand-specific analyses are crucial in 2023. GA4’s default data retention is only two months (extendable to 14). BigQuery removes time limits entirely. It captures every custom event and parameter in one table without row limits. Columnar storage and a tree architecture enable lightning-fast queries on massive datasets. Combines online/offline data for advanced analytics (CLV, clustering, association analysis, etc.) and supports built-in ML. Supports cross-platform measurement by joining data from various tools and CRM systems via user ID. Deep analytics in BigQuery lets you—for example—exclude offline purchases from online campaign audiences, boosting conversion rates.ChatGPTUndoubtedly the most talked-about AI of 2023 is ChatGPT. This conversational AI, powered by GPT-3.5, generates real-time, human-like responses—even writing code. Its ability to understand and answer virtually any question places it firmly among the year’s top trends.UX Laws & NeuroscienceNeuroscience studies the nervous system. By integrating physiology, anatomy, maths, developmental biology, and psychology, it explains learning, memory, behavior, perception, and consciousness. UX laws and neuroscience techniques apply these principles to web design to create more intuitive, brain-friendly user experiences. Every user interacting with your design follows certain psychological principles. For 2023, brands will use neuroscience to inform UX analyses and optimize site design for human cognition.For more on UX laws and neuroscience, see UX Laws & Neuro Science. If you haven’t implemented these integrations yet in Q1 2023, act quickly—don’t miss the trend.

What is GDPR? Is GA4 GDPR Compliant?
Data privacy has become increasingly important in recent years. This is due to consumers’ and users’ concerns about protecting their personal data and governments enacting various laws to safeguard that data. In this article, we’ll focus on Google Analytics 4’s (GA4) data privacy features and examine whether these features comply with the General Data Protection Regulation (GDPR).What Is GDPR?GDPR (General Data Protection Regulation) is a data privacy regulation that came into effect in 2018. It governs how organizations in the European Union collect, process, and store personal data. GDPR adopts a user-centric approach to privacy, requiring organizations to explain what data they collect, how they use it, and with whom they share it.Whom Does GDPR Cover?GDPR sets standards for processing personal data in the EU and the European Economic Area (EEA), establishing principles of transparency, fairness, purpose limitation, accuracy, integrity, and confidentiality.All companies operating within the EU or EEA must comply with GDPR when processing personal data. Moreover, any company outside the EU/EEA that handles personal data of EU/EEA residents must also adhere to GDPR rules.For example, an EU citizen visiting Turkey as a tourist falls outside GDPR’s scope while abroad. Conversely, a non-EU citizen in an EU country is protected under GDPR. If a U.S. citizen visits Germany, German organizations must handle that person’s data in compliance with GDPR, even though the individual is not an EU citizen.Does GDPR Apply in the U.K.?GDPR took effect in the U.K. in May 2018. After Brexit, the U.K. incorporated GDPR into its own Data Protection Act, maintaining equivalent protections for personal data.History of Privacy Fines Against Google AnalyticsGDPR has empowered data subjects with greater control over their personal information. Since its enforcement on May 25, 2018, Google has faced significant fines under GDPR. In March 2020, Sweden fined Google LLC €7 million for violating Article 17(1)(a) by not removing search results upon request. Then in December 2021, France’s CNIL fined Google €150 million because users could not refuse tracking cookies as easily as they could accept them. Google Ireland was fined €60 million, and Google LLC €90 million for the same issue.French regulators also rejected GA4’s IP-anonymization as insufficient to protect data transferred to the U.S. The EU Court of Justice in July 2020 invalidated the Privacy Shield framework governing EU-U.S. data transfers, further complicating Google’s ability to move EU data to its U.S. servers.Other data protection authorities in Austria, the Netherlands, and Norway have similarly found Google Analytics non-compliant with GDPR, threatening fines or restrictions.What Is Personally Identifiable Information (PII)?PII refers to any data that can identify an individual—name, address, birthdate, phone number, email, national ID, passport number, etc. Protecting PII is critical because its exposure can reveal someone’s identity and personal details.GA4’s User Privacy FeaturesGoogle Analytics 4 offers several privacy-focused settings, allowing site owners to honor user consent while still gaining useful insights. Two key areas under Data Settings are Data Collection and Data Retention. Let’s explore them.Data Collection SettingsYou can access Data Collection under Admin > Data Settings > Data Collection:Google Signals Enabling Google Signals allows GA4 to link signed-in users’ site/app data with their Google accounts, provided they’ve consented to ad personalization. Signals lets you use location, search, YouTube, and partner-site data in aggregate, anonymized reports. Users can manage this via myactivity.google.com.Location & Device DataTurning on these options lets Analytics collect geographic and device information, with the ability to exclude specific countries.User Data Collection ConsentHere, you confirm that your site/app informs users how their data will be collected and shared with Analytics, and that you’ve obtained their consent accordingly.Data Retention SettingsData Retention lets you choose how long user-level and event-level data are kept (2 or 14 months). You can also reset user data on each new session. Your choice should reflect your industry’s needs and the sensitivity of the information collected.IP AnonymizationGA4 anonymizes the last 8 bits of each user’s IP address by default, fully embedding anonymization in its data model. This protects users’ privacy while still providing geographic and device insights needed for analysis.Consent ModeWhen users deny cookie consent, your Analytics data will be incomplete. Consent Mode uses machine learning to model those users’ behavior based on similar consenting users, preserving privacy while retaining useful insights in your reports.Server Location & Data Transfer Restrictions in GA4Under GDPR, transferring personal data from the EEA or U.K. to outside jurisdictions without adequate safeguards is restricted. GA4 users cannot choose where their data is stored—much of Google’s infrastructure is in the U.S. If you process EU/U.K. personal data in GA4, you must ensure compliant transfer mechanisms are in place, often requiring legal consultancy.
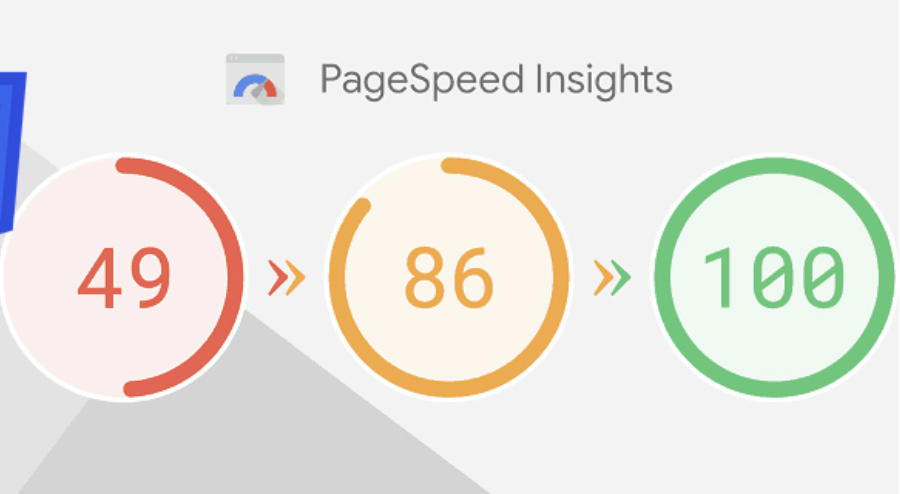
How to Identify Unused CSS and JS Lines?
Website speed is one of the most important metrics in SEO efforts. Nowadays, almost every search engine emphasizes fast-loading web pages, low DOM size, and minimal resource consumption. Therefore, search engines tend to avoid ranking pages that load slowly, contain unnecessary lines of code, or use excessively large DOM elements, as these are considered to provide a poor user experience.Through free speed analysis tools such as Pagespeed or GTMetrix, the most common issues we encounter are the warnings "Reduce Unused CSS" and "Reduce Unused JavaScript".Before taking any action on these warnings, it is essential to analyze the causes properly and understand which CSS and JavaScript files/libraries exist in the underlying structure of our website.Why Does the “Reduce Unused CSS and JavaScript” Warning Occur?In general, e-commerce platforms contain ready-made CSS and JavaScript libraries. Since these libraries are designed to be useful for any type of website, they include many CSS classes and JavaScript functions that we do not use.We can identify the CSS lines and JavaScript functions in these files that are not used on our website, clean them from the files, and make our pages load with higher performance. You can apply the method we share below on your own website to detect these lines!How to Detect Unused CSS and JavaScript Lines?First, after entering your website, right-click on the page you want to analyze and select "Inspect".Then, in the opened DevTools panel, click the three-dot icon on the right and activate More Tools > Coverage.At the bottom, in the Coverage panel, click the reload button to refresh the page and allow DevTools to load the CSS and JavaScript files on the page.Click on any of the loaded CSS/JavaScript files to open it in the DevTools tab.In the opened CSS/JavaScript file, sections highlighted in blue indicate that the corresponding CSS line/JavaScript function is actively used on the page, while sections highlighted in red indicate that it is unused.This way, we can easily determine which lines and functions in all CSS and JavaScript files hosted in our website's structure are used and which are not.What to Consider Before Cleaning Unused CSS and JS?Although it may seem that many of the codes in the CSS and JavaScript libraries loaded on our pages are unused, there are important points to consider before performing any cleanup. Before cleaning unused CSS and JS, make sure to pay attention to the following: Ensure that the relevant CSS/JS code is not used on every browser, device, or page. Some JavaScript functions only run on specific events. For example, functions triggered by user-side events like scroll or click should be carefully analyzed for active/inactive status before cleanup. Before cleaning CSS and JS, identify the files that increase your browser’s DOM size. Do not waste time on small CSS and JS files. Always back up your website before performing optimizations! By using this method, you can detect and clean unused CSS and JavaScript lines on your website, allowing your pages to load faster and provide a better experience for visitors!

How to Check Domain History?
Domain is the name given to the domain name owned by our website. For example, the domain name/domain of the https://analyticahouse.com website is "analyticahouse.com". Domains are used by renting them for a certain period of time from domain registrars (hosting/domain companies). When we are considering opening a new website or want to find out whether our existing website was used in the past, we need to check the domain history. We have compiled 2 great methods for you to check domain history!Why is Domain History Important?Knowing what purposes the domain name of the website we use was used for in the past, and whether it was exposed to any search engine penalties, will enable us to be more conscious and productive in the SEO optimizations we will apply on our website. In addition, analyzing the extent to which our website was affected by Google algorithm updates in the past will give us an idea for the SEO studies we plan to apply on our site. For this reason, checking domain history, knowing what purposes the website was used for in the past and how it was affected by Google algorithms will shed light on our future work.How to Check Domain History?You can apply the two different methods we mentioned in our video to check domain history. Thanks to these methods, you can learn both how your domain looked in the past, what it was used for, and to what extent it was affected by Google algorithm updates. Checking Domain History with WebArchiveIf you are wondering what your website looked like in the past, all you have to do is go to the WebArchive website, paste your site's main URL and press enter. WebArchive provides us with a chronological bar showing on which dates the website has been active since 1996 and the snapshots it has taken.From this section, you can select a year when your domain was active, and by clicking on the saved snapshots from the calendar below, you can find out what your domain looked like and what it was used for on that date!Learning How the Domain is Affected by Google Algorithm Updates with Website Penalty IndicatorYou can use the Website Penalty Indicator tool to learn how much our domain name/domain has been affected by past Google algorithm updates and whether it has lost its indexes/SEO visibility by receiving a penalty.After entering the website, all you have to do is write your domain name and select the Google extension for your country. Then, by saying "check domain", you can see how the domain name was affected by past Google algorithm updates.The Website Penalty Indicator tool is a completely free tool and shares with you how your website has been affected by Google algorithm updates. To examine in more detail and get information about what these algorithm updates are, you can also use SearchMetrics, a paid tool.To learn more about the Google algorithm updates and changes that may have affected your domain in the past, you can check out our blog post titled Important SEO Updates From Past to Present!
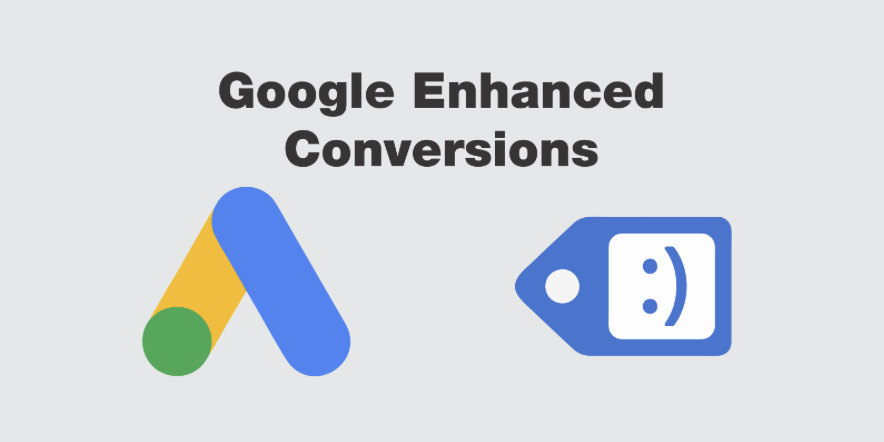
What is Enhanced Conversion Tracking?
One of the most important aspects of performance marketing is being able to measure campaigns accurately. Properly measured campaigns give you the chance to bid more precisely and target more effectively. However, your data is not always measured correctly. This can negatively impact your campaign performance and all related efforts. What you need here is a feature that allows you to track your data as close to accuracy as possible.It’s a fact that the work you do in Google Ads and the data you see on your analytics platform never fully match. If you want to improve the accuracy of your Google Ads data and make your subsequent optimization steps more precise, the first thing you should do is enable Google Ads’ Enhanced Conversions feature.What Is Google Ads Enhanced Conversions?Enhanced conversions are designed to increase the accuracy of your data in Google Ads. The goal is to take the first-party customer data that users leave on your website, hash it with a one-way algorithm, send it to Google, and thereby improve your existing conversion tracking measurements. Throughout this process, customer privacy is maintained and user data remains anonymous. First-party customer data is hashed before being sent to Google, and then matched to signed-in Google accounts to enhance the metrics you track as campaign conversions.How Do You Benefit from Enhanced Conversions?One of the greatest advantages of enhanced conversions is that they reduce uncertainty about which actions are most effective and deliver results, while also helping you move forward with more concrete data. This enables Google to improve the optimization of your campaigns. So, what are the benefits for you?1. Helps you better analyze the journeys of your existing and potential customers. 2. Enables you to progress your campaign-focused optimizations more accurately using enhanced conversion data. 3. Allows you to target campaigns with more precise data.How Does the Enhanced Conversions Process Work?Let’s illustrate the process with a concrete example. Imagine you sell shoes on your website. A visitor first clicks your ad on their work computer but doesn’t make a purchase. Later, they log in with their personal email on their phone and complete the purchase. The data collected in this scenario (email, phone number, etc.) are first-party data and are shared with Google. When the visitor clicked your ad, they used their work email. One method of verifying email identity is phone verification. The phone’s authenticator helps match the phone number used during the purchase to the work email. Thanks to enhanced conversions, this user is recorded as a single user by matching the first-party data. Without enhanced conversions, the visitor’s actions from different accounts would not match, and Google would record two separate users. Depending on the type of enhanced conversion used, the algorithm processes the data in different ways to improve measurement. Google summarizes this process as follows: Source: https://support.google.com/google-ads/answer/9888656?hl=en-GBWhy Use Enhanced Conversions?Enhanced conversions offer many benefits. If you’ve struggled with mismatched analytics and Google Ads data before, you know how valuable accurate data is. As privacy regulations tighten, it becomes harder to access user data. Enhanced conversions increase advertisers’ chances of obtaining first-party user data. More Conversion Data: With current privacy laws and third-party cookie restrictions, a lot of data goes unmeasured. Enhanced conversions’ hashing algorithm makes much of that data trackable. More Reliable Data Analysis: Campaigns based on enhanced conversions can be used more securely. In Google Ads, “data-driven attribution” and smart bidding strategies enable much more effective optimization decisions. First-Party Data: Privacy laws have severely restricted third-party data. Instead of relying on less reliable third-party data to measure conversions, using first-party data is a safer approach.Setting Up Enhanced Conversions in Google AdsBefore implementing enhanced conversions, the first step is to ensure compliance with the Google Customer Data Policies. Once that’s confirmed, you can set up enhanced conversions in several ways.1. Setup via Google Tag ManagerFirst, go to Tools & Settings > Conversions in your Google Ads account. Select the primary conversion action that matters most to you and click it. Under “Enhanced Conversions,” click “Turn on enhanced conversions” and select “Google Tag Manager.” Then use the “Check URL” feature to verify whether the Google tag is installed on your site. After that, follow the instructions here to complete setup in Tag Manager.2. Setup via CodeYou have two options for code-based setup: CSS Selectors: If the thank-you page already contains first-party user data, no additional code is needed. Google scans the page for that data to process enhanced conversions.The guide linked above details how to configure enhanced conversions using CSS selectors. JavaScript: If the customer data are defined as JavaScript variables on the conversion page, you can map those variables in the enhanced conversions snippet. The same guide provides detailed instructions for implementing enhanced conversions via JavaScript. Finally, you can use the Google Ads API to send first-party customer data as conversion adjustments. For details, see the API documentation.Troubleshooting After SetupIf enhanced conversions don’t work after setup, verify your configuration.1. Are Enhanced Conversions Working?Once set up, it can take a few days for data to appear. Check the “Status” column for progress. You can also click into the conversion action and view the “Diagnostics” tab for details. 2. Verify Global Site TagWhen configuring enhanced conversions with the global site tag, you may see a “Tag Not Detected” error. This often occurs if the URL is entered incorrectly or if the tag isn’t implemented on your site. Ensure that the enhanced conversion steps are configured via GTM or gtag.js correctly.Key Points About Enhanced Conversions- Data collected via enhanced conversions are fully anonymous. You cannot identify which specific users performed actions via your ads. Enhanced conversions do not grant access to personal data. - Enhanced conversions only work for the conversion actions you have configured. - More and more accurate data is always better for advertisers. Given current laws and restrictions, the enhanced conversions feature provides you with far more—and far more accurate—data than you’d normally obtain. Understanding which conversion events your ads influence in the customer journey provides invaluable insights. - You can easily set up enhanced conversions from your Google Ads interface. It’s a one-time setup per conversion action, not per campaign, which is sufficient to start measuring.

Forever Young: Evergreen Content
Evergreen content is like a magical forest that never loses its leaves. It's content that remains relevant and valuable to your target audience long after it's been published, delivering consistent traffic to your website and establishing your brand as a thought leader in your industry.The importance of evergreen content in content marketing cannot be overstated. Creating high-quality, informative content that solves your audience's problems builds trust, loyalty, and engagement with your readers. This can lead to increased website traffic, social shares, backlinks, and improved SEO rankings, all of which are critical for a successful content marketing strategy.So, if you're looking to create content that stands the test of time, you can start by identifying topics your audience cares about and providing actionable advice or information they can use. Keep reading to learn more.Definition of Evergreen ContentTerminologically, the word “evergreen”, is actually a journalism concept. Evergreen refers to timeless content in the context of journalism - since evergreen content is independent of what's new, it can be prepared in advance.This is also the case in the content marketing industry. Evergreen refers to content that remains relevant and useful to your audience over an extended period of time. It covers topics that are always in demand and provides timeless, informative, and actionable information. As we’ll discover, examples of evergreen content include how-to guides, industry insights, best practices, product reviews, and FAQs.Creating evergreen content is essential for a successful content marketing strategy. It helps establish your brand as a trusted authority in your industry, generates consistent traffic to your website, and can even improve your website's SEO ranking. By focusing on relevant topics for your audience, providing detailed and helpful information, and using engaging multimedia, you can create content that will continue to deliver results for your business for months or even years to come.What Makes Evergreen ContentEvergreen content is intended to be timeless, offering your readers useful content that is still relevant months, maybe even years after it was written. It's the type of content that never goes out of style, serving as a valuable resource for readers. If we compile the characteristics of evergreen content, we get a list like this: It’s timeless. Evergreen content is always relevant and useful to your target audience, regardless of trends or changes in the news cycle. It offers valuable information. It provides high-quality, informative, and actionable advice or solutions that help readers address their problems or achieve their goals. It’s a reliable source. Evergreen content is well-researched and factually correct, building trust and authority with your audience. It looks good. It's visually engaging and may include multimedia such as images, videos, or infographics to enhance its appeal. It’s SEO-friendly. Evergreen content is optimized for search engines, meaning that it includes keywords, meta descriptions, and other SEO best practices that help it rank well in search results. Prominent Forms of Evergreen ContentWhen it comes to creating evergreen content, there are so many options to choose from! The beauty of evergreen content is that it's never out of trend. From how-to guides and industry insights to product reviews and FAQs, there's no shortage of topics that can fall under the umbrella of evergreen content.Whether you're a blogger, marketer, or business owner, it's worth investing time and effort into creating evergreen content that delivers long-lasting results. Below you can find some types of evergreen content that are always useful with examples.“How-to” GuidesHow-to Guides are a staple of evergreen content because they provide clear, step-by-step instructions for completing a specific task or project. They can cover a wide range of topics, from cooking and gardening to DIY home improvement and digital marketing. The key to creating effective How-to Guides is to make them as user-friendly as possible. That's why they're often accompanied by visuals like images, infographics, or videos, which can help break down complex concepts into simple, easy-to-follow steps. WikiHow, as the name suggests, is one of the best platforms that curate How-to content. As you see in the picture, you can find a step-by-step how-to guide even for the most far-fetched and niche topics like “How to Pet a Cat”.By using a combination of clear, concise language and engaging visuals, How-to Guides can help your audience achieve their goals and tackle new challenges with confidence. Whether you're a business owner looking to attract new customers or a blogger seeking to grow your audience, How-to Guides are a valuable asset in any content marketing context.Best PracticesBest Practices are another excellent example of evergreen content. They offer readers tips and advice for doing something better, faster, or more efficiently, making them a valuable resource for anyone looking to improve their skills or knowledge. The great thing about Best Practices is that they can cover a wide range of topics, from productivity hacks and time-management tips to cooking techniques and fitness routines.You can work your way into being a go-to resource for knowledge and develop a devoted readership by giving your audience practical advice they can use in their daily lives. Whether you're writing for a niche audience or a broader demographic, Best Practices are an effective way to share your expertise and provide value to your readership.Industry InsightsIndustry Insights are a valuable type of evergreen content that covers topics related to your industry. These articles can include market trends and industry news, among other relevant topics. They serve as an opportunity for you to showcase your knowledge and expertise while establishing your brand as a thought leader in your field. One great example of an Industry Insights website is Investopedia. It covers many topics such as finance, economics, and international markets in addition to providing investment tips and insights.You can attract and keep a dedicated audience of industry professionals and interested readers by delivering insightful and helpful material. Additionally, Industry Insights can be used as a tool for networking and building relationships within your industry. Whether you're a startup founder, an established entrepreneur, or a marketer looking to expand your reach, Industry Insights can help you establish your brand as a credible and authoritative source of information in your field.FAQsFAQs, or Frequently Asked Questions, are an essential type of evergreen content that can provide valuable information to your audience. By addressing common questions or concerns, FAQs can save your readers time and effort while establishing your brand as a helpful and knowledgeable resource. Additionally, FAQs can be used to address any misconceptions or negative perceptions surrounding your brand or industry, helping to improve your reputation and build trust with your audience.Furthermore, FAQs can benefit your website's SEO by providing relevant and valuable information that search engines can crawl and index. By including well-written FAQs that match users' search queries, you can increase your website's authority and improve your overall search engine rankings. Whether you're creating an FAQ page on your website or incorporating FAQs into your blog or social media content, this type of evergreen content can be a valuable asset to your overall content marketing strategy.Product ReviewsProduct Reviews are a type of evergreen content that provides valuable information to your audience and helps them make informed purchasing decisions. Whether you're reviewing a physical product or a digital service, your readers will appreciate your insights and opinions on the item in question. A well-crafted Product Review should be honest, thorough, and detailed, providing your audience with a complete understanding of the product's benefits and drawbacks. For example, ConsumerSearch gathers customer feedback on all the top products in a certain category to conduct thorough product reviews.By offering your unique perspective on a product, you can establish yourself as a trusted source of information and build a loyal following of engaged readers. Additionally, Product Reviews can be an effective way to monetize your content and earn affiliate commissions for any sales generated through your links. Whether you're a blogger, a YouTuber, or a social media influencer, Product Reviews are a valuable type of evergreen content that can benefit both you and your audience.Benefits of Evergreen ContentEvergreen content is like a garden that keeps on giving - it requires a bit of nurturing and upkeep, but it continues to flourish and provide value long after it's been created. By producing and publishing evergreen content, you're planting seeds of knowledge that can continue to grow and attract new visitors to your website for months, even years, to come. Plus, since evergreen content is always relevant and informative, it can help establish your brand as a trusted authority in your industry. Think of it as an investment in your online presence that can pay dividends for years to come! Let’s see in which ways evergreen content is useful.SEO BenefitsEvergreen content can greatly benefit your search engine optimization (SEO) efforts because it provides lasting value to readers, leading to more traffic and increased engagement. Search engines value high-quality, relevant content that provides value to their users.You can show search engines that your website is a valuable resource for users seeking information on a specific topic, which can lead to higher search rankings and increased visibility by creating evergreen content.Longevity and SustainabilityLongevity and sustainability are two key benefits of evergreen content. Unlike other types of content such as topical and seasonal content that may quickly lose relevance or popularity, evergreen content is designed to remain useful and informative over a long period of time.Improved Brand AwarenessEvergreen content can also help improve your brand awareness by establishing your brand as an authority in your industry. By consistently providing high-quality, informative content that is valuable to your audience, you can build a reputation as a trusted source of information. This can lead to increased brand recognition and a stronger connection with your target audience, ultimately helping to drive more traffic and sales to your website.ConclusionTo recap, evergreen content is an important component of any content marketing plan. You can increase the number of visits to your website, position your brand as an authority figure in your sector, and raise your SEO rankings by producing high-quality, educational material that stays relevant over time. The secret is to give your audience something of value, whether you're writing product reviews, industry insights, how-to tutorials, or FAQs. So, start coming up with ideas for evergreen content now, and see how your online presence develops!Sources https://en.wikipedia.org/wiki/Evergreen_(journalism) https://digitalmarketinginstitute.com/blog/the-beginners-guide-to-evergreen-content https://www.wordstream.com/blog/ws/2012/10/16/guide-to-evergreen-content-marketing https://ahrefs.com/blog/evergreen-content/ https://buffer.com/library/evergreen-content/ https://coschedule.com/blog/evergreen-content